
Introduction
Well not quite all the way; but the process described here is manual enough for my purpose. The goal is to know the makeup of transactions in enough detail so as to allow us to understand the issue of transaction malleability, and the proposed fixes for this ‘bug’. What I want to accomplish in this post is a sufficiently deep dive into how transactions work and how they are put together while avoiding the use of tools like Bitcoin libraries and the reference client wherever they abstract over certain pertinent details.
Let’s get back to our simple single input, single output transaction.
Figure 1: The P2PKH transaction we’ll build in this article.
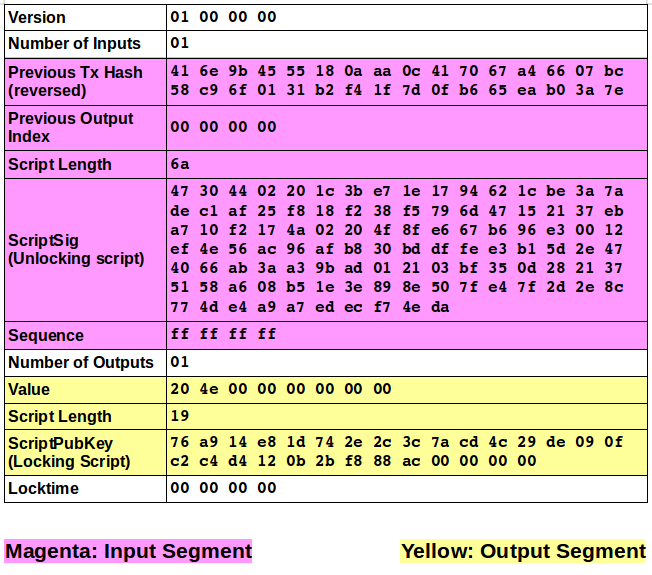
Figure 1, the same figure you saw in Part 1, illustrates the structure of a typical P2PKH transaction. In fact, this figure represents the end result of our effort to build a transaction by hand. Throughout this Part 2, we will go through all the steps that eventually lead us to the raw transaction data structure depicted in Figure 1.
Step 1: Building the Transaction, Minus the scriptSig
Entering the Outpoint and Other Standard Fields
The Input segment has two functions. First, it identifies the Output of a previous transaction that we intend to spend in the current transaction. Second, it holds the scriptSig that will unlock the scriptPubKey of that Output. The scriptSig we will deal with later.
The first field specifies the transaction hash (transaction ID) of that previous transaction which contains the Output we now want to spend. The second field specifies the Index of that output. Together, these two fields are referred to as the outpoint. The previous transaction whose Output we want to spend can be called the funding transaction.
For our example, I am using the following transaction as our funding transaction:
https://blockchain.info/tx/7e3ab0ea65b60f7d1ff4b231016fc958bc0766a46770410caa0a1855459b6e41
If you click on the link, you will see that this particular transaction (sent from an exchange) has numerous outputs. But the output we want to spend is, coincidentally, the very first output. So, the index of that Output, our Input UTXO, is 0 or 0x00 in hex.
Figure 2: Funding Transaction showing the top of the page from the block explorer.
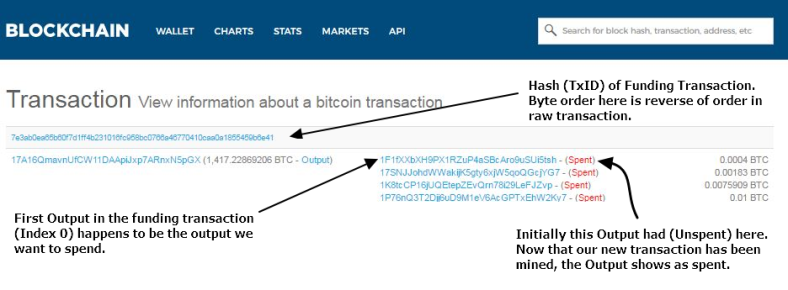
Figure 3: Transaction template filled out minus the scriptSig and Output segments
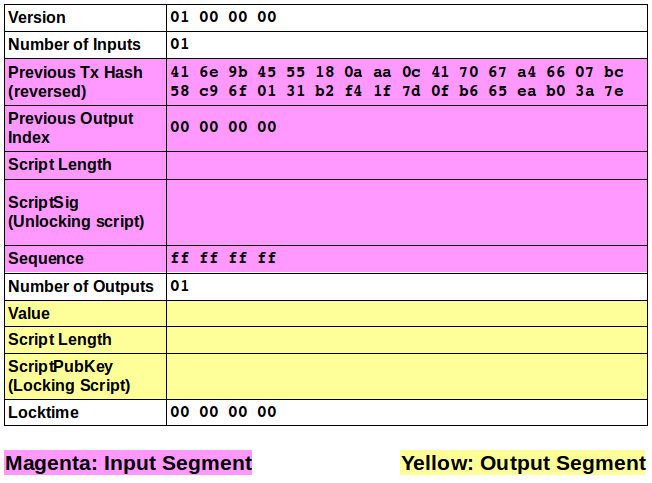
In entering the transaction hash (or transaction ID) of the previous transaction, note that we need to reverse the byte order from what is displayed in block explorers (and Bitcoin client RPCs). Compare the hash we have entered into the Input segment with the hash shown in Figure 2 above. The reason for this quirkiness is not fully understood. (A detailed account can be found here if you’re interested.)
The index of the previous Output must be a 4 byte entry in little endian format. (If we were spending Output 01, then our entry would be 01000000).
The Sequence field is always entered as shown (0xffffffff) for a typical transaction. Number of Inputs and Number of Outputs are 01 each while the Version and Locktime fields are entered as shown. Both are padded to four bytes and in little endian format. The Locktime specifies when this transaction will be valid. If set to 0, as is normally the case, the transaction can be broadcast and mined immediately.
Filling out the Output Segment of the Transaction Template
Next we’ll proceed to build the Output segment. Obviously, the value of the Output we are creating must be less than the value of the previous Output we are spending in the Input segment. The difference will become the transaction fee. To know the value of the previous Output we need to examine the funding transaction in Figure 2 where it is shown to be 0.0004 BTC.
I have chosen to assign a value of 0.0002 BTC (or 20,000 Satoshi) to the Output, hence making the transaction fee 0.0002 BTC also. The value field must show the Output value in Satoshi, in hex format, padded to eight bytes and entered in little endian order.
Let’s see how we arrived at the end result: 20000 in hex is 4e20. Padded to eight bytes equals 0000000000004e20. And finally, when reversed into little endian order we get: 204e000000000000.
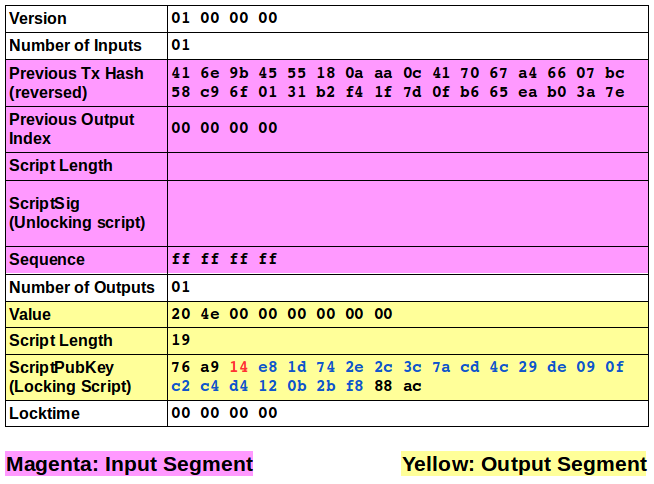
Figure 4: Filled-in Output segment

The Output segment essentially creates a UTXO, as we learned in Part 1. You were also introduced to the scriptPubKey of a typical P2PKH transaction.
In Figure 4 above, I have entered, in hex format, the scriptPubKey of the P2PKH transaction we are building. How exactly did we arrive at this string of bytes?
If you recall from Part 1, the general format of the scriptPubKey looks like this:

From the Bitcoin Wiki you can get the hex codes for the four opcodes in this locking script (OP_DUP is 0x76, OP_HASH160 is 0xa9, OP_EQUALVERIFY is 0x88, and OP_CHECKSIG is 0xac).
The bytes in blue represent the bitcoin address that will be associated with this UTXO once created. That is, this transaction is assigning the ownership of the 20,000 Satoshi to the entity that controls the address represented by the bytes in blue. But the string of blue bytes doesn’t look anything like a bitcoin address? That’s because this string of bytes is actually the public-key-hash representation of that address. Deriving the PUB-KEY-HASH from the bitcoin address, in this case 1NAK3za9MkbAkkSBMLcvmhTD6etgB4Vhpr, can be done quite easily by using any Bitcoin library. For example, with Vitalik Buterin’s Pybitcointools, the following command decodes the address into the public key hash:
>>> b58check_to_hex('1NAK3za9MkbAkkSBMLcvmhTD6etgB4Vhpr')

'e81d742e2c3c7acd4c29de090fc2c4d4120b2bf8'

>>>
You can also use this website and then strip off the prefix and suffix as explained in this document.
Hashmal, the Bitcoin Script IDE introduced in Part 1, will allow you to decode the base58check encoded address into the public key hash with just one paste and click.
We are mostly done with the scriptPubKey entry with only the byte in red left to be accounted for. 0x14 is a PUSHDATA opcode which says that the next 20 bytes (or 0x14 bytes in hex) is to be pushed onto the stack.
The Script Length field specifies the number of bytes that make up the scriptPubKey which is 25 bytes or 0x19 in hex.
Figure 5: Transaction Template filled out minus the scriptSig
Step 2: Creating the scriptSig (Unlocking Script)
We are back to working on the Input segment. Now we need to create the all-important scriptSig or unlocking script which is the most tricky1 part of creating a transaction by hand.
Producing a digital signature using Bitcoin’s implementation of ECDSA (Elliptic Curve Digital Signature Algorithm), requires possession of the signing private key and a hash of the message to be signed. The message we want to sign is the transaction itself, but in reality it’s a modified version of the final transaction. Next we work through the steps that put together the message that will be signed, taken largely from this Stack Exchange answer, which is in turn mostly a rehash of this earlier answer.
Constructing the Transaction Message That Will Be Signed
We will proceed to construct the message for the transaction we’ve partly built already as shown in Figure 5. Note the scriptSig (unlocking script) field. In place of the final scriptSig, which we do not yet have of course, we enter instead the scriptPubKey of the previous Output that we are trying to spend. That is, we examine our funding transaction and retrieve the scriptPubKey (locking script) for that specific Output. In Figure 2, you see the top of the funding transaction. In Figure 6 below, we see the same transaction, but display the lower part of the block explorer page where we can see the scriptPubKey of the Output with Index 0 (the first Output).
If you click on this link and scroll to the lower part of the page, you should see the following:
Figure 6: Funding Transaction Showing scriptPubKey of the Previous Output
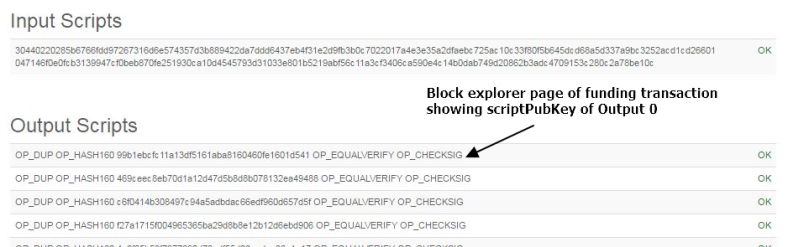
The scriptPubKey, presented in human readable form in the block explorer, will look like this when converted to hex:
76a91499b1ebcfc11a13df5161aba8160460fe1601d54188ac
The details of how this is derived has already been described above when filling out the Output segment.
The Script Length field is Ox19 (25 bytes) which is the length in bytes of the scriptPubKey above.
Figure 7: Signing Message Template with scriptPubKey of previous Output in place of scriptSig
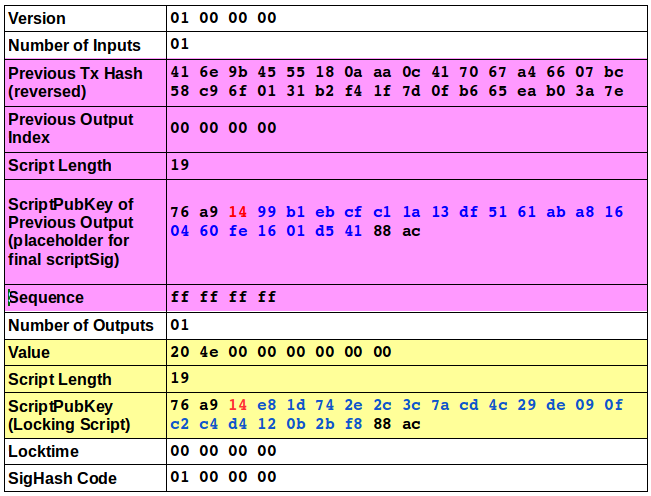
Note that Figure 7 becomes the Signing Message Template rather than the transaction template because as stated earlier, what you sign is slightly different from the final transaction. The main differences are the scriptPubKey in place of the final scriptSig, and the addition of the SigHash code, specifying the signature hash type, at the bottom. The various signature hash types indicate which parts of the transaction are included in the signed message.
For normal transactions, the SigHash code will be 1 for SIGHASH_ALL. This signature hash type means that the signature includes all the Inputs and Outputs minus the scriptSig.
The SigHash code is padded to four bytes and entered in little endian format, hence the entry you see in Figure 7.
In the case of a multi-Input transaction, each Input must be signed separately. And as one Input is being signed, all other Inputs in the constructed signing message will be empty where the scriptSig is supposed to be.
The completed transaction message, as hex data, that will be double hashed and then signed:
0100000001416e9b4555180aaa0c417067a46607bc58c96f0131b2f41f7d0fb665eab03a7e000000001976a91499b1ebcfc11a13df5161aba8160460fe1601d54188acffffffff01204e0000000000001976a914e81d742e2c3c7acd4c29de090fc2c4d4120b2bf888ac0000000001000000
Double SHA256 Hashing the Transaction Message Before Signing
Generating a double SHA256 hash of the transaction message can be accomplished in several ways. The easiest way is probably to execute the following in Python:
>>> import hashlib
>>> mhex = ‘transaction_message_hex’
>>> hashlib.sha256(hashlib.sha256(mhex.decode('hex')).digest()).hexdigest()
This gives you the double SHA256 hash of the message output in hex:
'456f9e1b6184d770f1a240da9a3c4458e55b6b4ba2244dd21404db30b3131b94'
Note that we will need the output in bytes, not hex, when we actually do the signing in the next section. To output the double hash in bytes do this:
>>> hashlib.sha256(hashlib.sha256(mhex.decode('hex')).digest()).digest()
If you have a Linux terminal, you can use this method:
klmoney@aspire:~$ mhex=0100000001416e9b4555180aaa0c417067a46607bc58c96f0131b2f41f7d0fb665eab03a7e000000001976a91499b1ebcfc11a13df5161aba8160460fe1601d54188acffffffff01204e0000000000001976a914e81d742e2c3c7acd4c29de090fc2c4d4120b2bf888ac0000000001000000
klmoney@aspire:~$ echo -n $mhex | xxd -r -p | openssl dgst -sha256 -binary | openssl dgst -sha256
(stdin)= 456f9e1b6184d770f1a240da9a3c4458e55b6b4ba2244dd21404db30b3131b94
You can also use any Bitcoin library, for example Pybitcointools2.
Generating the Signature (ECDSA) of the scriptSig
We need to step back here and refresh our memories as to what this signature – a separate signature for each Input – is supposed to achieve. The Elliptic Curve Digital Signature Algorithm (ECDSA) used by Bitcoin results in a signature that accomplishes two things: Firstly, it proves that the signer has in his possession the private key associated with the address in the scriptPubKey (locking script) of the previous Output we want to spend in the current transaction. Possession of this private key entitles the signer to spend the Output. The signature thus proves the authenticity of the spender. Secondly, because the transaction, albeit a modified form (the transaction message), is what is being signed, it will allow the Bitcoin client verification software to confirm that no changes have been made to the significant parts of the transaction since it was signed. Any change to meaningful parts of the transaction would be picked up during execution of the OP_CHECKSIG opcode and invalidate the signature. The signature thus proves the integrity of the transaction.
The procedure I describe for signing the message largely follows the method outlined here in which the Python ECDSA library is used. Most crypto libraries would include a function that derives the signature in a more direct way, but I thought this approach would be more educational.
Using Python in interactive mode, these are the steps that eventually result in the signature:
>>> import hashlib, ecdsa, binascii
>>> from ecdsa import SigningKey, SECP256k1
a) Assign the transaction message hex string to a variable:
>>> unsigned = ‘0100000001416e9b4555180aaa0c417067a46607bc58c96f0131b2f41f7d0fb665eab03a7e000000001976a91499b1ebcfc11a13df5161aba8160460fe1601d54188acffffffff01204e0000000000001976a914e81d742e2c3c7acd4c29de090fc2c4d4120b2bf888ac0000000001000000’
b) Generate the double SHA256 hash of the message and output the result in bytes:
>>> txhash = hashlib.sha256(hashlib.sha256(unsigned.decode('hex')).digest()).digest()
c) The private key associated with the previous Output’s address, in hex format:
>>> privkey = '3cd0560f5b27591916c643a0b7aa69d03839380a738d2e912990dcc573715d2c'
Note: Assuming you start with a private key in WIF-compressed format, such as those produced in bitaddress.org then you would have a private key that starts with either a ‘K’ or an ‘L’. The private key associated with the previous Output I’m spending, is:
KyFvbums8LKuiVFHRzq2iEUsg7wvXC6fMkJC3PFLjGVQaaN9F1Ln
(Important: Normally you should never reveal a private key.)
The WIF (Wallet Import Format) –compressed private key is a base58check encoded representation of the hex version of the private key. Since it is the hex version that we use, we need to decode the WIF-compressed key. Bitaddress.org will do this for you. Or, you could use a Bitcoin library like Libbitcoin or Pybitcointools3. If you use either of these libraries, you will need to remove the 0x01 suffix which was added to the private key before encoding into WIF-compressed format. This is explained by Andreas Antonoupolous here.
d) Next execute the following code to derive the signature:
>>> signingkey = ecdsa.SigningKey.from_string(privkey.decode('hex'), curve=ecdsa.SECP256k1)
>>> SIG = signingkey.sign_digest(txhash, sigencode=ecdsa.util.sigencode_der_canonize)
>>> binascii.hexlify(SIG)
'304402201c3be71e1794621cbe3a7adec1af25f818f238f5796d47152137eba710f2174a02204f8fe667b696e30012ef4e56ac96afb830bddffee3b15d2e474066ab3aa39bad'
Note: The generation of the signature involves the input of a random number. Hence, each time you re-execute the above code, you will get a different signature.
Putting the scriptSig Together
The scriptSig comprises the signature and the public key derived from the signing private key. We already have the signature, so now we need the public key, which will be a compressed public key in this case. Bitaddress.org will generate the compressed public key from the WIF-compressed private key. But you could also use a Bitcoin library4. The end result will be:
’03bf350d2821375158a608b51e3e898e507fe47f2d2e8c774de4a9a7edecf74eda’
Above is the compressed public key derived from this private key:
KyFvbums8LKuiVFHRzq2iEUsg7wvXC6fMkJC3PFLjGVQaaN9F1Ln
If you jump back to Table 5, which is our Transaction template, you’ll see that the only missing piece is really the scriptSig. The following table, breaks down the scriptSig into its various parts as described by Peter Wuille in this Stack Exchange answer.
Figure 8: The various elements that make up the scriptSig.
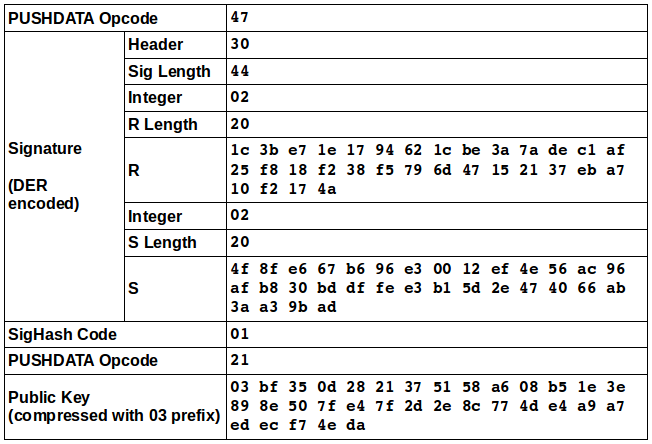
There are a few points to note about the make-up of the scriptSig:
- The PUSHDATA opcode 0x47 (or decimal 71) is the number of bytes that will be pushed onto the stack. This includes the one byte sigHash code.
- The R and S components of the DER encoded signature can be either 32 or 33 bytes in length (as explained in the Stack Exchange answer linked above). As such, the PUSHDATA opcode at the top may be 0x47, 0x48 or 0x49.
- Recent transactions use compressed public keys as in this example. Compressed public keys are 32 bytes with a one byte prefix of 02 or 03. Uncompressed public keys are 64 bytes plus a prefix of 04.
The final scriptSig in hex:
47304402201c3be71e1794621cbe3a7adec1af25f818f238f5796d47152137eba710f2174a02204f8fe667b696e30012ef4e56ac96afb830bddffee3b15d2e474066ab3aa39bad012103bf350d2821375158a608b51e3e898e507fe47f2d2e8c774de4a9a7edecf74eda
The scriptSig can now be entered into our previously incomplete transaction template (Figure 5) to finish our P2PKH transaction build:
Figure 9: Completed transaction (as in Figure 1).

The final serialized raw transaction5 in the form that will be broadcast into the Bitcoin network:
0100000001416e9b4555180aaa0c417067a46607bc58c96f0131b2f41f7d0fb665eab03a7e000000006a47304402201c3be71e1794621cbe3a7adec1af25f818f238f5796d47152137eba710f2174a02204f8fe667b696e30012ef4e56ac96afb830bddffee3b15d2e474066ab3aa39bad012103bf350d2821375158a608b51e3e898e507fe47f2d2e8c774de4a9a7edecf74edaffffffff01204e0000000000001976a914e81d742e2c3c7acd4c29de090fc2c4d4120b2bf888ac00000000
Evaluating the Raw Transaction Before Broadcast
If you have installed the Bitcoin Script IDE Hashmal introduced in Part 1, you can do several things quite easily:
- Ensure that your raw transaction is properly put together. (Later you’ll see how to deserialize your raw transaction without Hashmal.)
- Check that the signature actually works and the transaction verifies.
- Examine the execution of the unlocking script and locking scripts and see a visual representation of the Bitcoin Script stack operations.
Figure 10: Deserialized view of the raw transaction in Hashmal
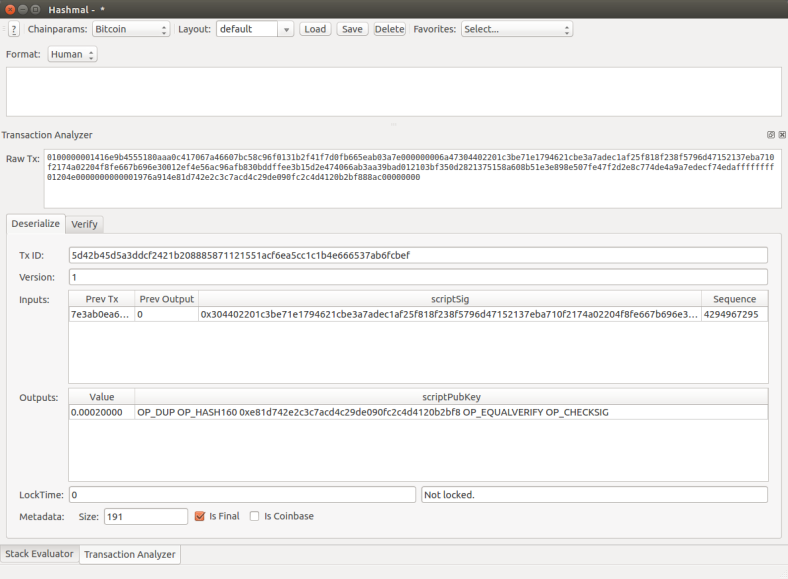
Above you see the human readable view of our raw transaction in Hashmal’s Transaction Analyzer.
Figure 11: In Hashmal’s Transaction Analyzer with Verify tab selected.

In this screen we can verify the Input (or Inputs) we are trying to spend in the transaction. The unlocking script (scriptSig) of the Input segment will have to work with the Input UTXO’s (previous Output’s) locking script (scriptPubKey) for that particular Input to be verified. This screen provides a convenient way to check if your generated ECDSA signature is OK.
In Part 1 we worked with a schematic of the unlocking and locking scripts and saw how Bitcoin’s Script language execution works. The following two screens work together to illustrate how Bitcoin’s scripting works with a real-world transaction. We even get a visualization of the stack operations step by step.
Before we can see the stack operations step by step, select the Transaction tab of the Stack Evaluator and paste in the raw transaction as shown in the next figure.
Figure 12: In the Stack Evaluator’s Transaction tab, paste in the raw transaction.
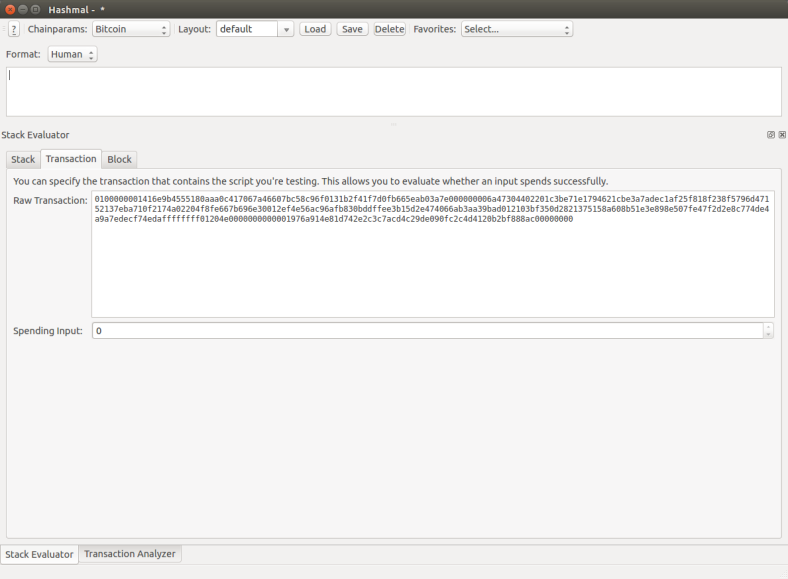
Once you have done the above, proceed to select the Stack tab in the Stack Evaluator. Next you can build the Input UTXO’s (previous Output’s) scriptPubKey in the Format text box as shown in Figure 13, or you can simply paste the hex form of the scriptPubKey directly into the Script text box. You should already have this scriptPubKey in hex format from when you constructed the transaction message to be signed.
Figure 13: Input the scriptPubKey of the Input UTXO (previous Output) and select Evaluate.
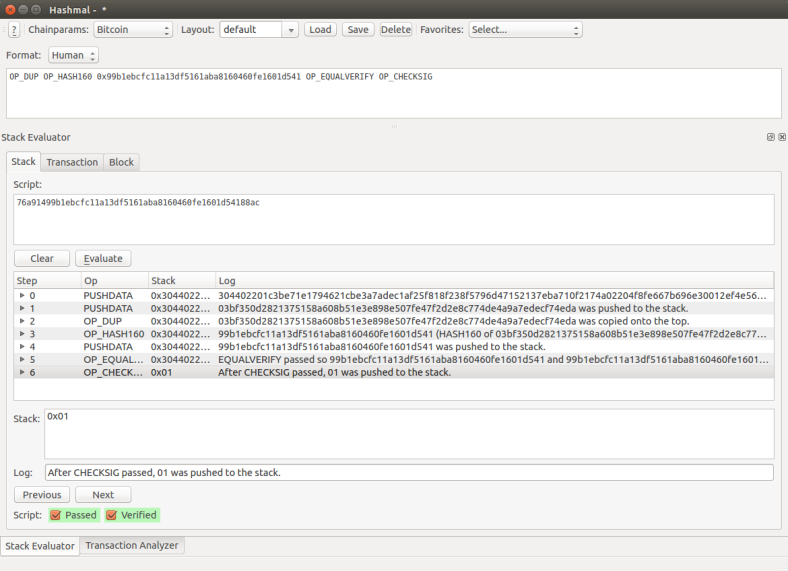
When you select the Evaluate button, Hashmal will execute the scriptSig and the scriptPubKey in two separate steps one after the other on a shared stack, just as we did with the schematic scripts in Part 1.
This appears to be how it’s done: The scriptSig (signature + public key) is pulled in from the raw transaction we pasted into Figure 12. Then stack execution proceeds with the scriptPubKey you entered into Figure 13. If all goes well, including the all important OP_CHECKSIG operation, you should be rewarded with the “Passed” and “Verified” outcome highlighted in green.
Let’s work through the script execution byte-by-byte, at least partly. This process is made super clear by Hashmal’s step-by-step visualization of the stack as shown in Figure 13.
The scriptSig extracted from the raw transaction would look like this:
47304402201c3be71e1794621cbe3a7adec1af25f818f238f5796d47152137eba710f2174a02204f8fe667b696e30012ef4e56ac96afb830bddffee3b15d2e474066ab3aa39bad012103bf350d2821375158a608b51e3e898e507fe47f2d2e8c774de4a9a7edecf74eda
And the scriptPubKey is this:
76a91499b1ebcfc11a13df5161aba8160460fe1601d54188ac
- STEP 0: Execution begins with the PUSHDATA opcode 476 which means that the next 0x47 bytes (71 bytes) are to be pushed to the stack.
In this operation, the signature plus the sigHash code (01) are pushed. - STEP 1: Another PUSHDATA opcode 21 pushes the following 0x21 (33) bytes comprising the public key to the stack.
- STEP 2: We now enter the second stage of script execution where the OP_DUP opcode (0x76) is executed.
- STEP 3 to STEP 6: These have already been described in Part 1 and should be obvious from Figure 13.
Broadcasting the Raw Transaction Into the Bitcoin Network
We have several options for broadcasting the raw transaction, besides using the reference client. Among them are:
- https://insight.bitpay.com/tx/send
- https://live.blockcypher.com/btc-testnet/pushtx/
- https://blockchain.info/pushtx
We’ll go with the Blockchain.info service. Here we can also decode our raw transaction before broadcasting it.
Figure 14: Decoded raw transaction.
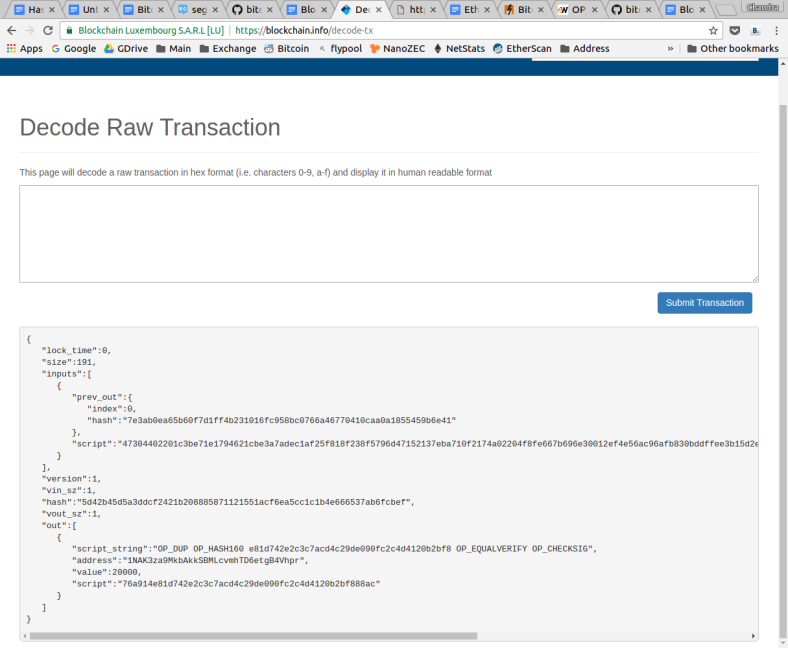
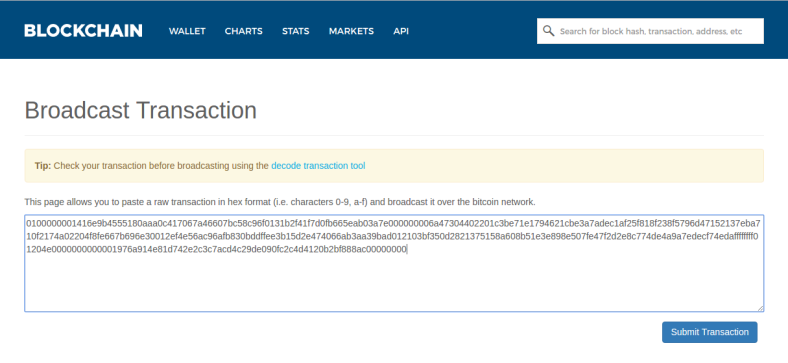
And the final step is getting our hand-built raw transaction into the Bitcoin network to be eventually mined and recorded in the Blockchain.
Figure 15: Broadcasting the Raw Transaction into the Bitcoin Network.
Footnotes:
[1] The way signatures is implemented in Bitcoin transactions has stirred much controversy which is ongoing to this day. For a little history on some of this discussion, you might want to check out the posts on Bitcointalk by legendary poster DeathAndTaxes. In a post from May 2014 he writes, “Honestly I have no idea what Satoshi was trying to accomplish with the overly complicated mess that is Bitcoin tx signatures but given a few other questionable decisions (using uncompressed pubkeys, non-canonical signatures, including pubkey in inputs when they could be reconstructed from the signature, etc) I believe as smart as Satoshi was ECDSA wasn’t his strong suit. He used it but he wasn’t an expert at it.”
[2] To double SHA256 with Pybitcointools:
>>> dbl_sha256(binascii.unhexlify('message_hex'))
[3] In Pybitcointools:
>>> b58check_to_hex('KyFvbums8LKuiVFHRzq2iEUsg7wvXC6fMkJC3PFLjGVQaaN9F1Ln')
'3cd0560f5b27591916c643a0b7aa69d03839380a738d2e912990dcc573715d2c01'
[4] With Pybitcointools, use this:
>>> privtopub('3cd0560f5b27591916c643a0b7aa69d03839380a738d2e912990dcc573715d2c01')
'03bf350d2821375158a608b51e3e898e507fe47f2d2e8c774de4a9a7edecf74eda'
Notice that the 0x01 suffix is added to the private key hex to get a compressed public key.
[5] Getting the transaction hash or transaction ID of this transaction is a simple matter of double SHA256 hashing the hex string. The hash you get will be the reverse of what is displayed in a block explorer though, meaning the displayed hash is the “wrong way round”.
[6] If an opcode lies between 0x01 and 0x4b (inclusive), it’s a push data operation where the opcode itself is the length in bytes of following data that is to be pushed
